


Watercolor as meditation
Painting line by line


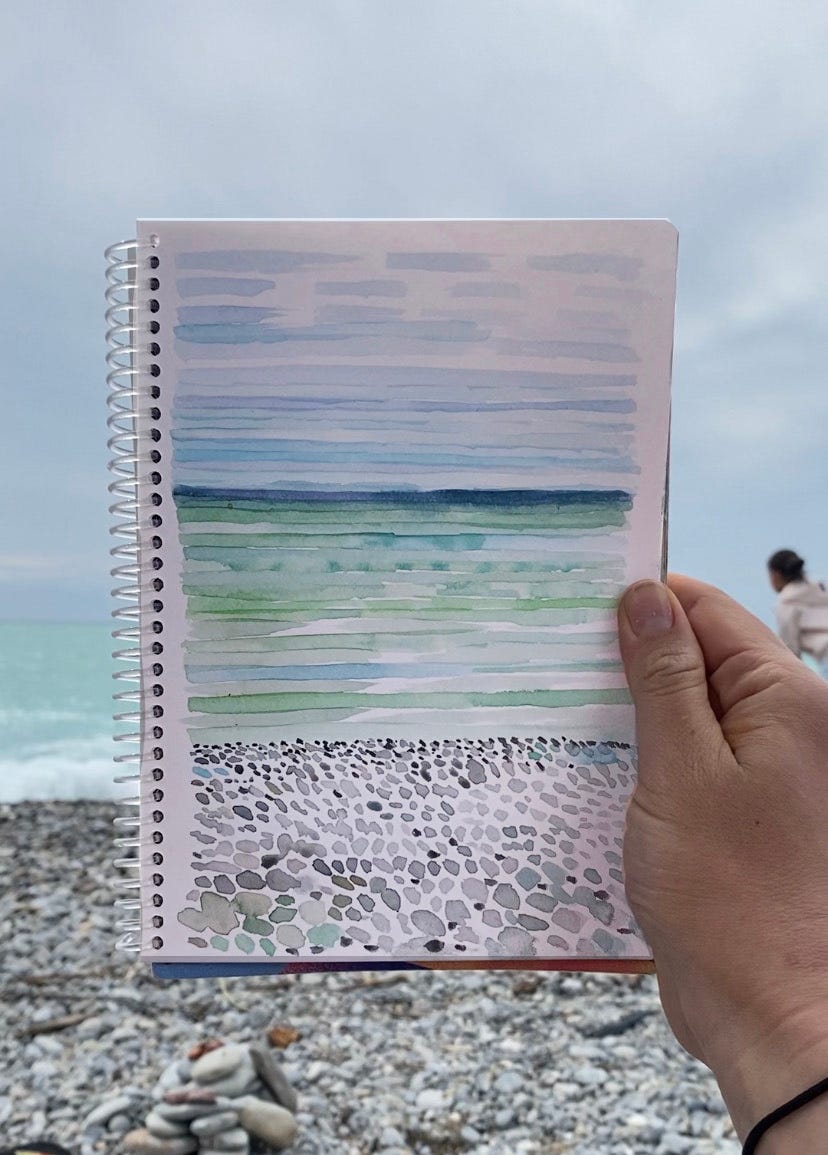
Controversial opinion! I secretly don’t love painting en plein air. I never like what I do and there’s too much pressure to paint realistically. On a recent trip to Nice, I plopped down in front of sea and automatically thought “been here, done this”. When you feel like your work is in a slump and you can’t find the joy in painting what’s in front of you (happens to the best of us!), abstract what you see! This was a meditation in layering stripes of color for the sky and building a pattern of circular shapes for the beach, forcing me to study the color and perspective more intensely. You may also recognize a similar exercise in Day 16 of my new book Thinking in Watercolor.
Here’s how I did it. And remember that realism isn’t the goal!
Supplies: watercolor-compatible sketchbook or watercolor paper (I used my new Papier Tigre + La Nouvelle Vague Couleur sketchbook which I was kindly gifted, travel watercolor paints (I had this one at the bottom of my mom purse), a watercolor paintbrush, patience & an overpriced double espresso
Goals: abstracting what you see into lines and other shapes, building depth with pattern, playing with perspective, loosening up and not falling into a perfection trap
Step 1: Find inspiration
I was drawn to the strong horizon lines of where the sky met the water and shore. We’re going on a whim here and not starting with a sketch but be really be intentional about how you break down the composition. I broke down the paper into a thirds, a reliably effective way of breaking down the image.
Step 2: Abstraction

I study the nuances of how the sky is darker closer to the horizon line and feathers out into clouds the further up it goes. I start with the first line of sky, alternating with an empty space in between each line. After the first layer dries, I can then fill in the blank so I have greater control and the planes of watercolor don’t merge together.

What’s the best way to suggest a rocky beach? I build circular forms, larger closer to me and progressively smaller the closer they are to the horizon line.
Step 3: Contrast
Once your layers are dried, go back and reinforce anything that needs it. I always like to go back to the source of whatever it is I’m painting and look at it with squinted eyes. This helps to really spot out what the darkest portions are. For me, I add a more purple-blue to distinguish the horizon line (or where the sky meets the sea). The rocks aren’t very distinct so I go back with some black on my paintbrush and add a few darker pebbles.
Step 4: Reflect
When you’re finished, stop. Come back in a few minutes with fresh eyes if need be, but you can always add more but you can’t take away. Ask yourself how you liked painting with this new technique. What are some other ways to adapt this by painting pixels or repeated circles?
Take care, dear reader. And don’t drink the watercolor water. -jkw
Got a burning watercolor question? Don’t forget to join my watercolor hotline where you can share what Thinking in Watercolor has inspired and connect with other watercolor fanatics.
Come paint with me in Paris! I’m hosting two enchanting watercolor workshops overlooking the Seine May 2nd (in English) and May 4th (in French). There are only a few tickets left so don’t miss out.
Looking for more cool watercolor ideas and encouraging tips? Order my new book Thinking in Watercolor, available wherever books are sold. If you have it already, please take a hot sec to write and short & sweet Amazon review. They really do help.
Love what I do? Please share this post with a friend and consider being a paid subscriber.
Beautiful watercolor.... I am going to try this when we have a beach day on Lake Michigan. Excited to give it a try!! Thank you for the inspiration and guidance.
What a great idea to get out of a slump. Needed this and love it!